Custom Claims in Entra ID: Integrating Application Access Control with SSO

June 11, 2025

Mehdi Mohseni
Introduction
Configuring Entra ID custom claims SSO is essential when you need to pass application-specific permissions through your authentication tokens. Whenever the topic of access management in software arises, a recurring question is how the backend can provide access information to the frontend. The complexity increases when you need a feature switch or access control system that is managed inside your application and you want to control user access to various features based on their permissions or purchased capabilities.
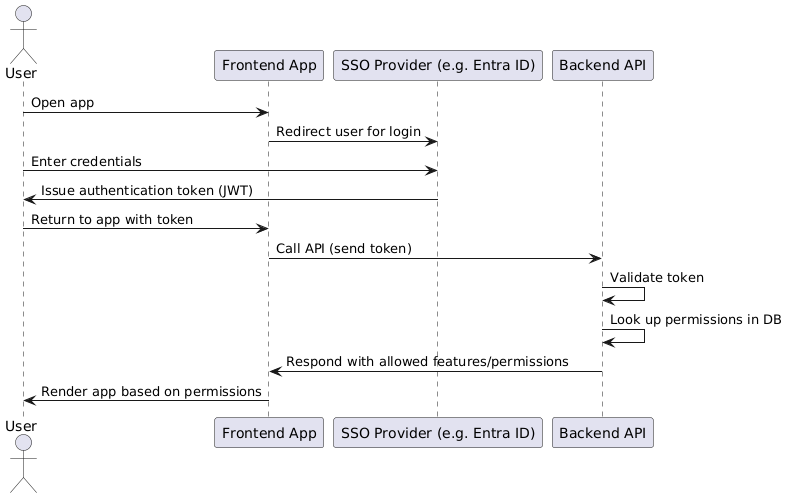
In short, while this information lives in your own database, your backend is not responsible for authentication. In most modern architectures, you rely on an external SSO provider such as Entra ID or similar services for authentication.
In the simplest software design, these two systems can be entirely decoupled: The user authenticates via SSO and receives a token. Afterwards, the frontend calls an API, and the backend responds with what the user is and isn’t allowed to access.

Challenges with Traditional Architecture
Now let’s examine the challenges of this architecture:
- Both the backend and the frontend need to request permissions from the authorization service. This request must be repeated on almost every API call, because otherwise, the user could easily manipulate the client-side permissions.
- Whether we like it or not, the same authorization request is repeated over and over again. This inevitably impacts the performance and speed of the application.
- If we consider the token as the single point of truth for security in our software design, this architecture actually violates that principle. That’s because authentication and authorization are handled by two separate systems working side by side.
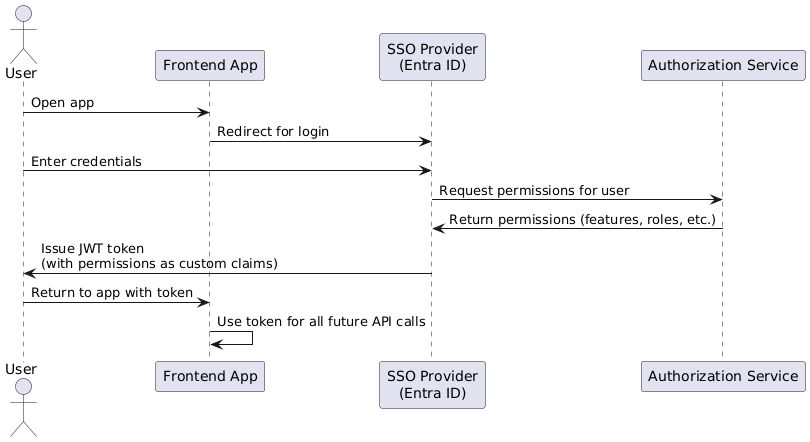
A Better Approach: Embedding Permissions as Custom Claims in the Token
Now that we understand the limitations of the conventional approach, the question is: what’s the right solution? In my view, the most effective method is for the SSO provider to integrate with your authorization (permissions) service during the authentication pipeline, at the moment the JWT is being issued.
Specifically, the SSO provider should query the authorization service to retrieve the user’s permissions, then embed these as custom claims within the JWT. This way, all necessary access rights are delivered as part of the authentication token, eliminating the need for separate permission checks on every API call.
Benefits:
- The backend and frontend can trust the token as the single source of truth for both authentication and authorization.
- Additionally, this reduces unnecessary API calls, improves performance, and ensures consistency.
- Furthermore, users cannot easily manipulate their permissions, since they are cryptographically signed into the token itself.
Benefits of Embedding Permissions as Custom Claims in the Token
Strong Security: This approach is very secure. The token cannot be easily manipulated, and validating the token inherently means validating the user’s permissions. Since custom claims are embedded within the JWT, simply verifying the token’s authenticity with the provider also confirms the validity of the permissions—no separate checks are required.
One-Time Permission Retrieval: Although we’ve essentially shifted the place in the system where permissions are retrieved, the crucial point is that this operation only needs to happen once per authentication. Therefore, there’s no need to query for permissions repeatedly with every request; simply verifying the token suffices.
Preserving the JWT as the Single Source of Truth: This architecture respects the principle of the JWT being the single source of truth for security. As a result, authentication and authorization are unified within the same token, preventing fragmentation or duplication of responsibility across different system components.
This token-based approach is similar to how modern AI systems like RAG systems in .NET use embeddings to encode information efficiently—the key data travels with the request rather than requiring separate lookups.
Step-by-Step: Integrating a Custom API with Microsoft Entra ID
Let’s skip the preliminary discussions and get straight to the point. In this article, we will focus on integrating your own Identity and Access Management (IAM) system with Microsoft Entra ID. This integration consists of the following key steps:
- Developing a Custom API: You’ll need to build an API that adheres to the contract defined by Entra ID, ensuring it can handle both the request and response formats required by Entra ID.
- Configuring Entra ID: Proper configuration is necessary within Entra ID to connect it to your custom API and enable the integration features.
- Securing the Connection: Finally, you must secure the communication between your API and Entra ID to ensure only authorized requests are accepted.
Let’s get started!
Building the Custom Claims Provider API
You are free to use any programming language or framework to build your API. However, the only requirement is to comply with the contract defined by Microsoft. In this article, I’ll demonstrate the process using an Azure Function as an example, but the technology you choose—whether it’s .NET, Node.js, Python, or anything else—makes no difference as long as you meet Microsoft’s integration contract.
Let’s create a simple Azure Function with no business logic, just to ensure that the contract between our API and Entra ID is correctly implemented. If you’re not familiar with Azure Functions, you can easily scaffold a blank Azure Function project by running the following command. (Note: you’ll need to install the Azure Functions Core Tools (func) beforehand. Install the Azure Functions Core Tools)
func init DotNetTalk.CustomClaimProvider --worker-runtime dotnetUnderstanding the Function Code
Let’s go ahead and create the required function, and briefly explain how it works. The following function actually covers both steps 1 and 3: it receives the request from Entra ID, returns the expected response, and also handles authentication and security between your API and Entra ID.
First, add the function below to your Azure Functions project. Please note that this function requires data models for the request and response formats defined by Entra ID, which should be placed in a separate project. You can download the complete code and models from the repository linked below.
https://github.com/MehdiMohseni82/entra-custom-cliam-provider-api
Code Walkthrough
Now, let’s walk through this code together. The method signature is a standard isolated-process Azure Function. We’ve also added the appropriate annotations and attributes for OpenAPI, so you can take advantage of Swagger UI for testing and documentation.
The function is currently set to allow anonymous access, since in the next step we’ll secure this API from within the function itself. (While this isn’t always best practice, I’ve done it this way to keep the code generic so you can later adapt it for use in a regular ASP.NET API if you wish.) Of course, you can always change the access level to Function and then secure it further via your Function App settings.
In the next few lines, we essentially check that the request actually comes from a trusted source—in this case, Entra ID. We’ll refer back to this section when configuring Entra ID later on. In general, you’ll have an App Registration in Entra ID responsible for establishing a secure connection between Entra ID and your API. As you can see in the TenantId and Audience fields, you specify the information for this App Registration.
Entra ID will include a JWT in every request. Consequently, all you need to do is ensure that this JWT is valid and has been issued by a trusted authority. In the final part of the function, you can implement the business logic for generating and returning claims. You’ll also be able to inspect the incoming request in detail. For example, the request lets you access the user’s Object ID, App ID, and other relevant data—so you can base your business logic on these details.
The last part of the code is where you return the response according to the contract defined by Entra ID.
Configuring the Entra ID
Alright, now our API is up and running. I won’t go into deployment details here—I trust you’ll be able to handle deployment on your own.
At this point, we’ve covered steps one and three. Now we’re moving on to the most challenging part: Configuring Entra ID so it can connect to our API. However, there are a few important prerequisites you need to know before getting started:
- Custom Claim Providers are only available in tenants with a Premium Plan 2 (P2) license. Other license tiers do not support this feature.
- You must be using a B2B tenant. B2C tenants do not support custom claim provider extensions. Therefore, before you continue, make sure your environment meets both of these requirements.
Prerequisites Summary
- A Custom Claim Extension. While creating this custom claim extension, you must also set up an App Registration for authentication. This App Registration will provide a secure link between Entra ID and your API.
Let’s start from here. We’ll assume you have an account with Global Admin privileges in Azure. I strongly recommend verifying your access level before you proceed.
Now, navigate to: https://entra.microsoft.com/#home
You can access this process from various sections in the Azure Portal or the Entra admin center, but we’ll proceed via the Entra ID management environment.
Creating the Custom Extension
- From the left navigation panel, expand Applications and click on Enterprise Applications.
- The main Enterprise Applications panel will open.
- In the right-hand panel, select Custom claim extension.
- Click Create a custom extension to enter the creation workflow for a new custom extension.

Now you need to complete three main configuration sections:
Basic Configuration
In this step, you specify which event will trigger your custom authentication extension. For a custom claim provider, you should select the TokenIssuanceStart event, then proceed to the next step: Endpoint Configuration.
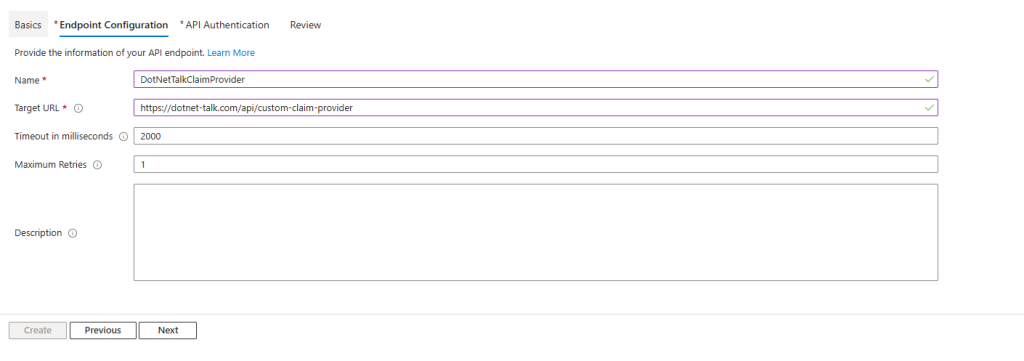
Endpoint Configuration
Here, you configure how Entra ID will connect to your API. The most important field is the Target URL, which must be an HTTPS address pointing to your API endpoint.
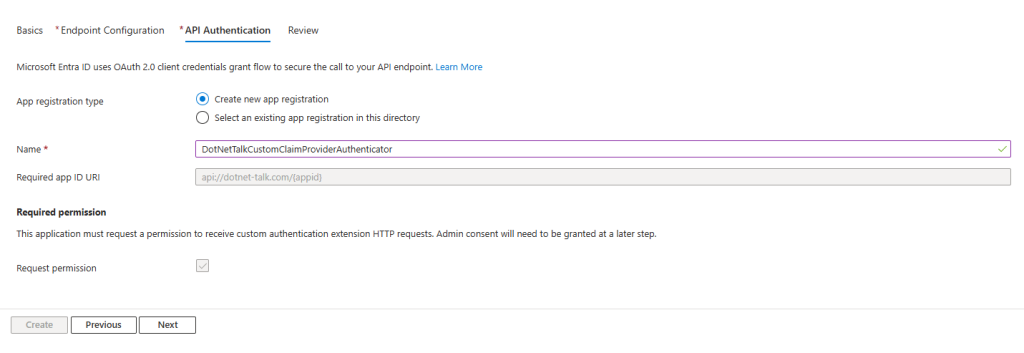
API Authentication
In this step, you configure the App Registration responsible for securing the connection between Entra ID and your API. You can either select an existing App Registration or allow Entra ID to create a new one for you.
I recommend letting Entra ID create a new App Registration—this will automatically set up the required permissions and configurations based on the endpoint you provided in the previous step.
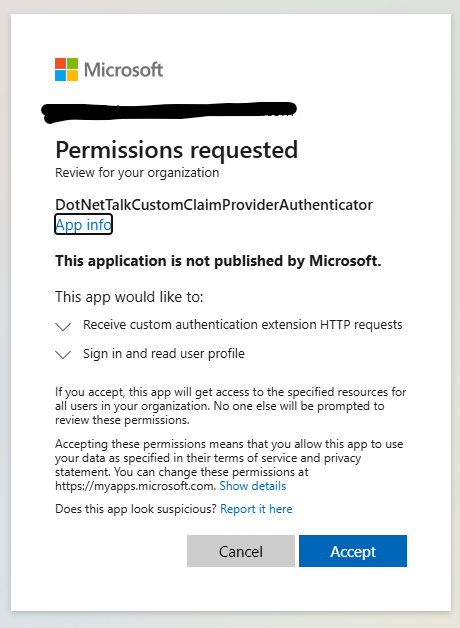
Important: If you choose to create a new App Registration, make sure to select “Request permission.” This will ensure that, in the following step, you’ll be prompted to grant admin consent for the extension, which is required for proper operation.
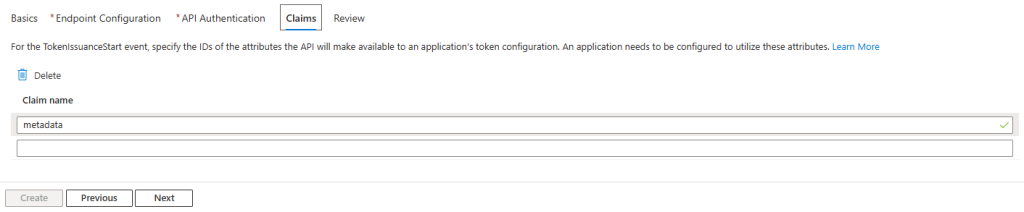
Defining Custom Claims
Next, you’ll define your custom claims. A simple but crucial point: these custom claims are read directly from the response payload your API returns.
Any property under the Claims property of the TokenIssuanceStartAction object in your API’s response can be surfaced as a custom claim here. For example, in the sample below, we have two custom claims: metadata and features. Both can be exposed as custom claims.
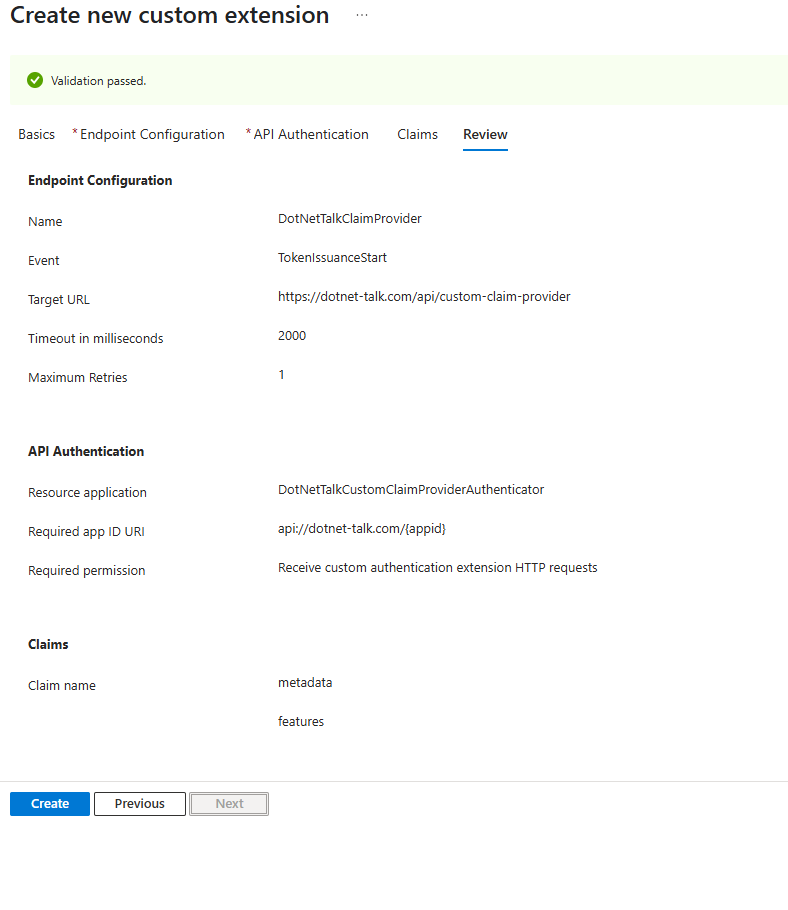
Review and Create
After completing all steps, you’ll reach a Review page. Here, you can review your settings before finalizing the creation of the extension. This review step is very important, as even a small mistake can cause the system to fail.
Troubleshooting Common Issues
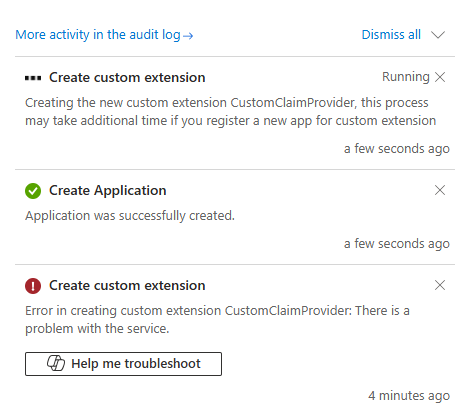
If everything goes well, after you click the Create button, Entra ID will create both a custom extension and an App Registration for you—completing one of the most important steps in the process.
However, if this is your first time creating a custom extension in a new tenant, there’s a high chance you’ll encounter an error. Unfortunately, identifying the cause of this error is usually almost impossible, as Entra ID provides no detailed explanation. You’ll simply see a generic error message, similar to the example below.
Missing Enterprise Application Fix
The reason for this error is that Entra ID requires a specific Enterprise Application to be present in your tenant in order to create a custom extension. This Enterprise Application is a predefined application created by Microsoft and should be automatically added to your tenant when you purchase a P2 license—but in practice, it often isn’t.
Details of the required Enterprise Application:
- Name: Azure Active Directory Authentication Extensions
- Application ID: 99045fe1-7639-4a75-9d4a-577b6ca3810f
The Application ID is very important, because there is no user interface in the Entra ID or Azure portal to add this Enterprise Application manually. As a result, you must add it using the Microsoft Graph CLI or PowerShell.
$ New-AzureADServicePrincipal -AppId "99045fe1-7639-4a75-9d4a-577b6ca3810f"To run the above command, you’ll first need to install either the AzureAD PowerShell module or the Microsoft Graph PowerShell SDK, and sign in with the appropriate credentials. Once you’re logged in, you can execute the command to add the required Enterprise Application.
Install-Module -Name AzureAD
Import-Module AzureAD
Connect-AzureAD
Or alternatively:
Install-Module Microsoft.Graph
Connect-MgGraph -Scopes "Directory.AccessAsUser.All"
If everything goes well, you should see a result similar to the following:
ObjectId                             AppId                                DisplayName
--------                             -----                                -----------
[ObjectId in your Tenant]         99045fe1-7639-4a75-9d4a-577b6ca3810f     Azure Active Directory Authentication Extensions\
If you encountered an error in the previous step and have now completed the above process using the Microsoft Graph module, try clicking the Create button again. Hopefully, this time the process will succeed. If so, you’ll be presented with a screen like this:
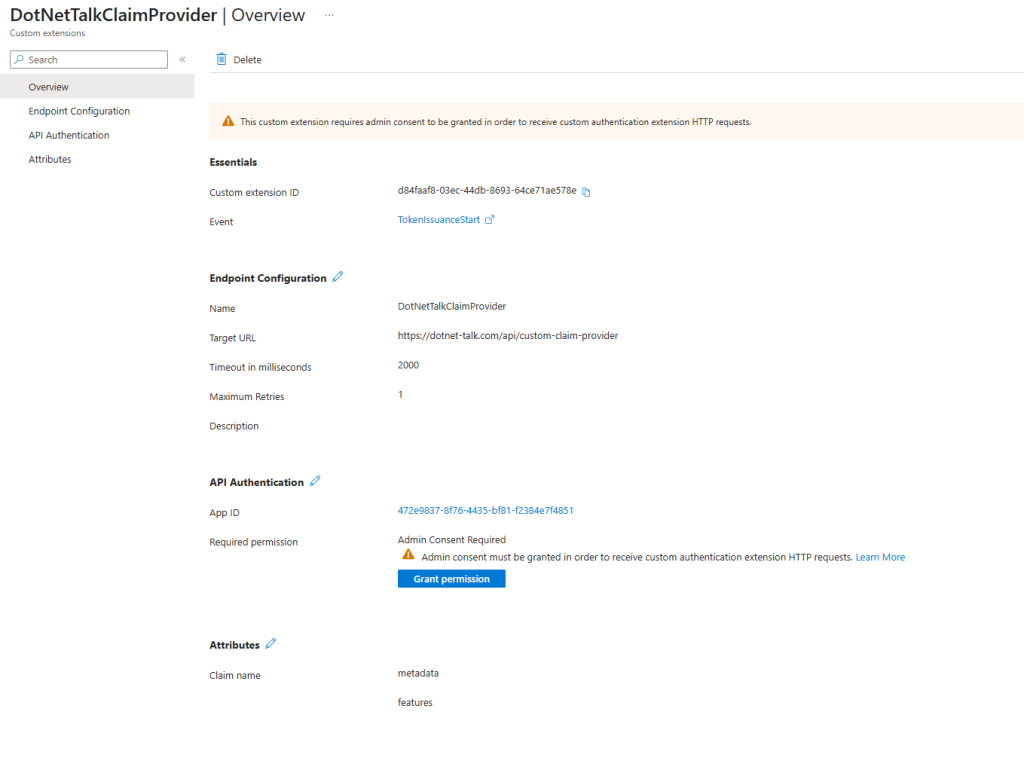
Granting Admin Consent
What’s happening here? The App Registration responsible for API Authentication requires admin consent for the CustomAuthenticationExtension.Receive.Payload permission. This permission, which is part of the Microsoft Graph API permissions, allows custom authentication extensions associated with the app to receive HTTP requests triggered by an authentication event. The request may include information about the user, the client and resource service principals, and other authentication details.
Now click on the Grant Permission button. You will get this popup.
Using Custom Claims in Your Application
Now we have successfully created our custom claim provider—but these claims are not being used anywhere yet. The final step in this process is to create a new App Registration for authenticating your application. For example, suppose you have an Angular web app and you want users to log in with Entra ID and make use of these custom claims.
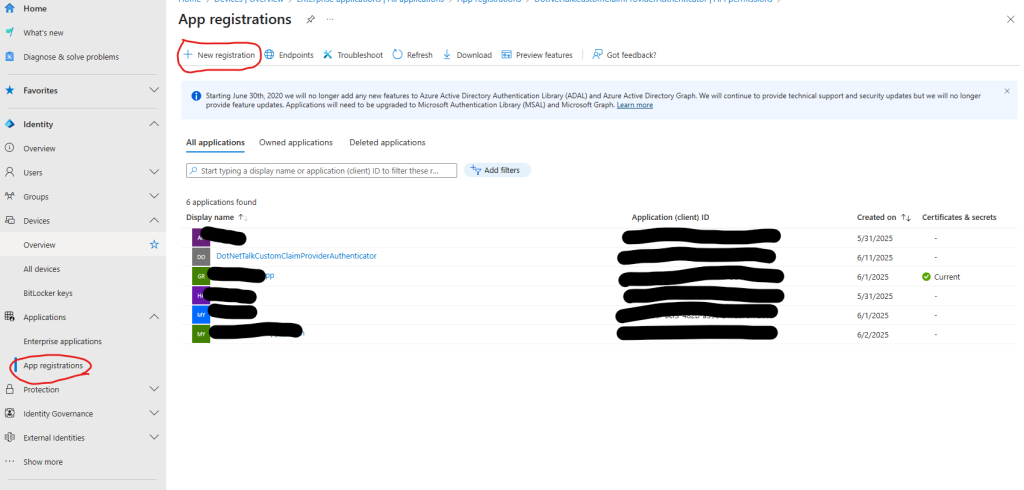
Let’s go through the process step by step. I’ll assume you already have a general familiarity with the Entra portal. Navigate to App registrations and create a new App Registration for your application.
Configuring the Authentication Platform
Now I have created a new App Registration. However, this App Registration doesn’t have any authentication platform configured yet. To set this up, go to the Authentication section and add a new platform.
Since we’re assuming this is an Angular web application, select Single-page application as the platform. Configure the settings for localhost (for example, http://localhost:4200). Now, you should have something similar to the following.
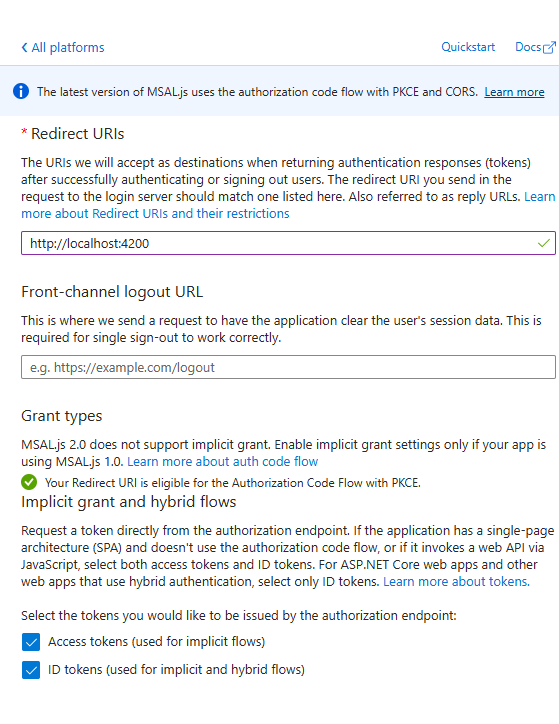
Be sure to select the ID Token option. Custom claims will only appear in the ID Token—not in access tokens.
Wiring Up Custom Claims for Your App
Do you think we’re done? Not quite! There’s still one more step to complete in Entra ID.
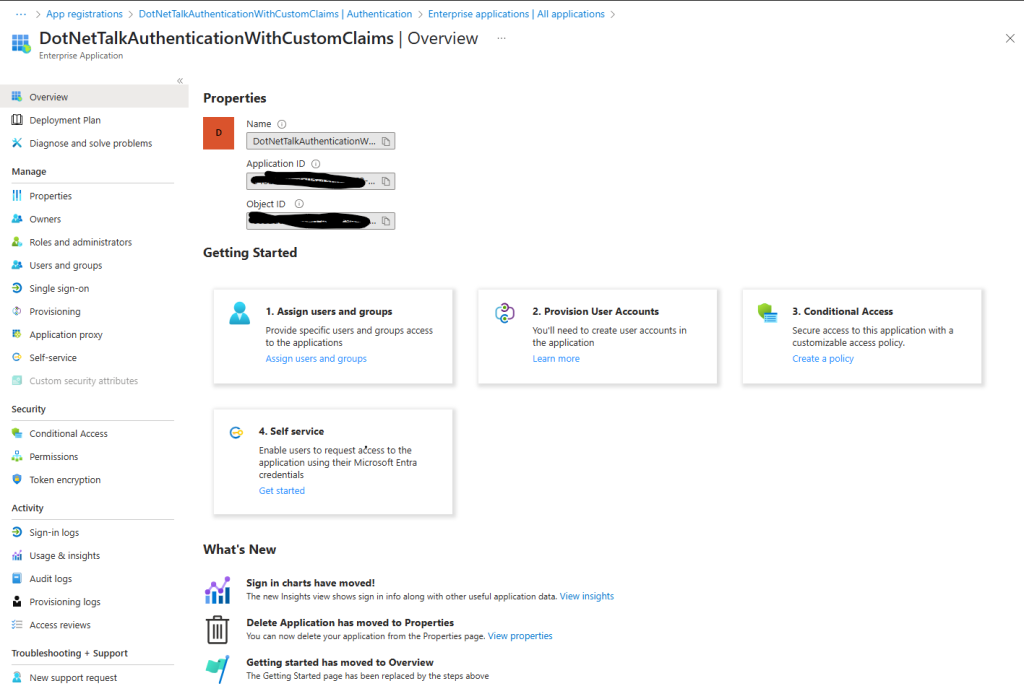
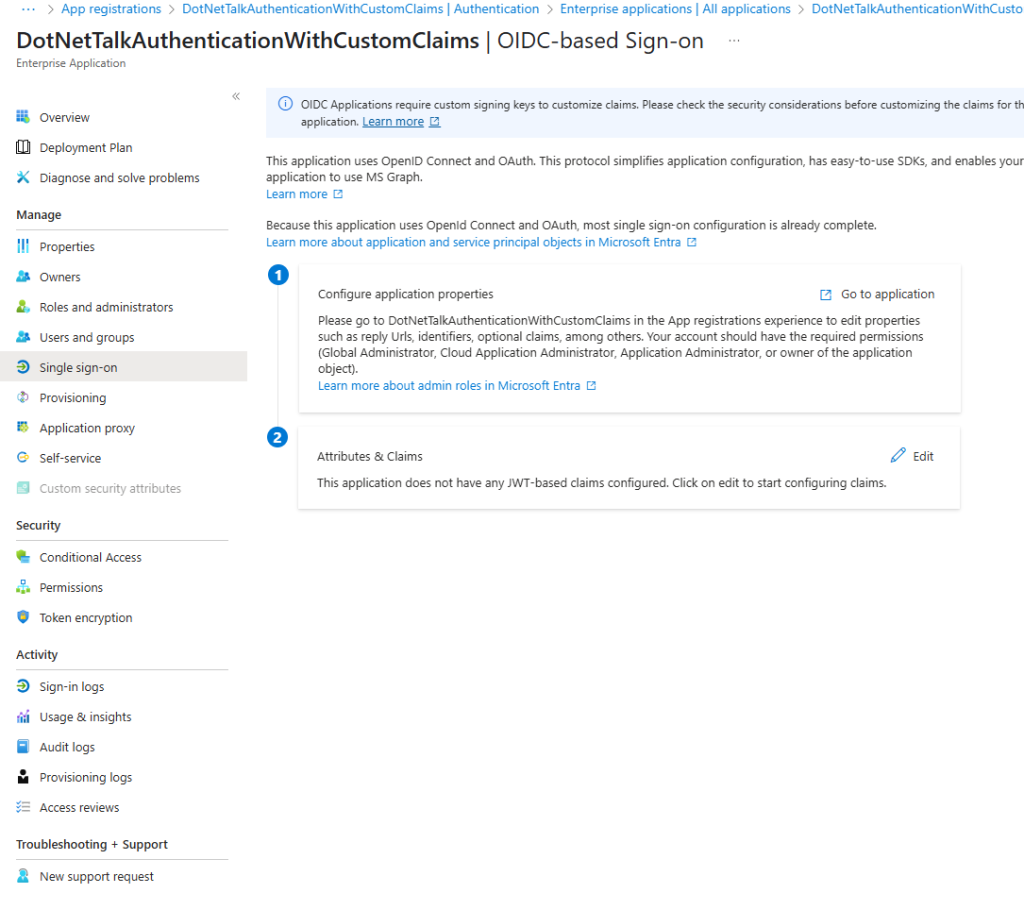
Now, we need to tell Entra to include these custom claims for this specific App Registration. When we created the App Registration, Entra automatically created an associated Enterprise Application for us.
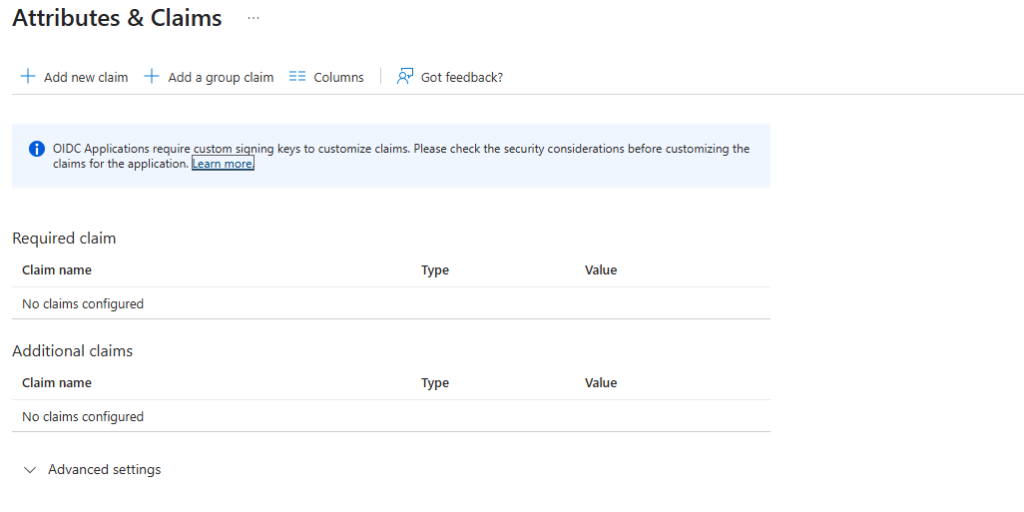
Now, from the right-side panel, select Single Sign-On and then go to the Attributes & Claims section. Click the Edit button to open the following page.
And then
Selecting the Custom Claim Provider
On this page, click the Advanced Settings button, then select the Custom Claim section. From the dropdown, choose your custom claim (identified by the name and URL you assigned earlier). You should end up with something similar to the screenshot below.
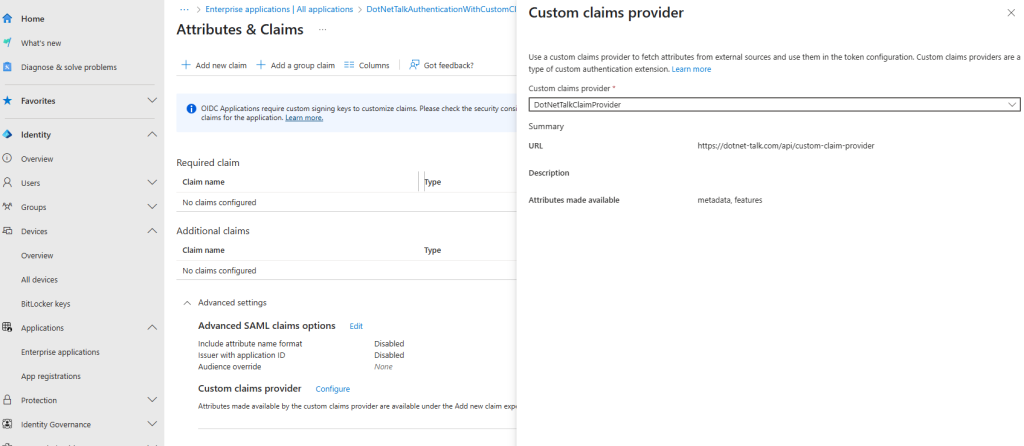
You’ve now added the custom claim extension! But what does this actually mean? Are the custom claims automatically added to your token? Nope! Are the custom claims now available in your App Registration? Yes!
Adding Individual Claims to the Token
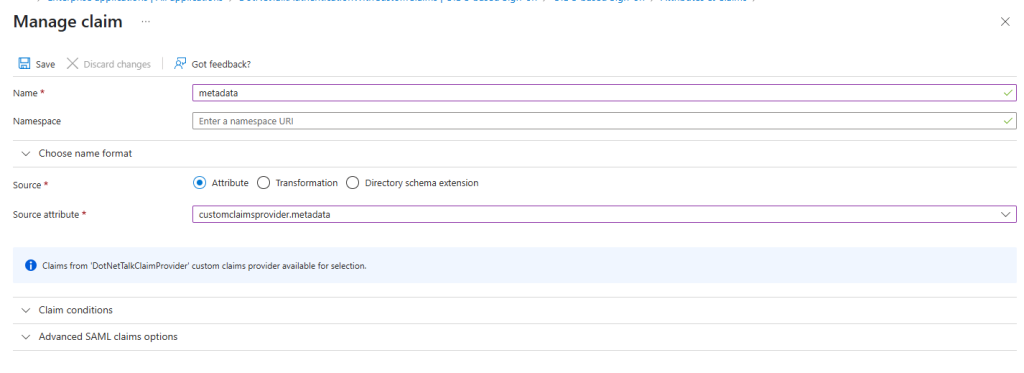
Let’s keep going. Now, you need to manually add each custom claim to your token. To do this, click the Add new claim button and select your custom claim from the list.
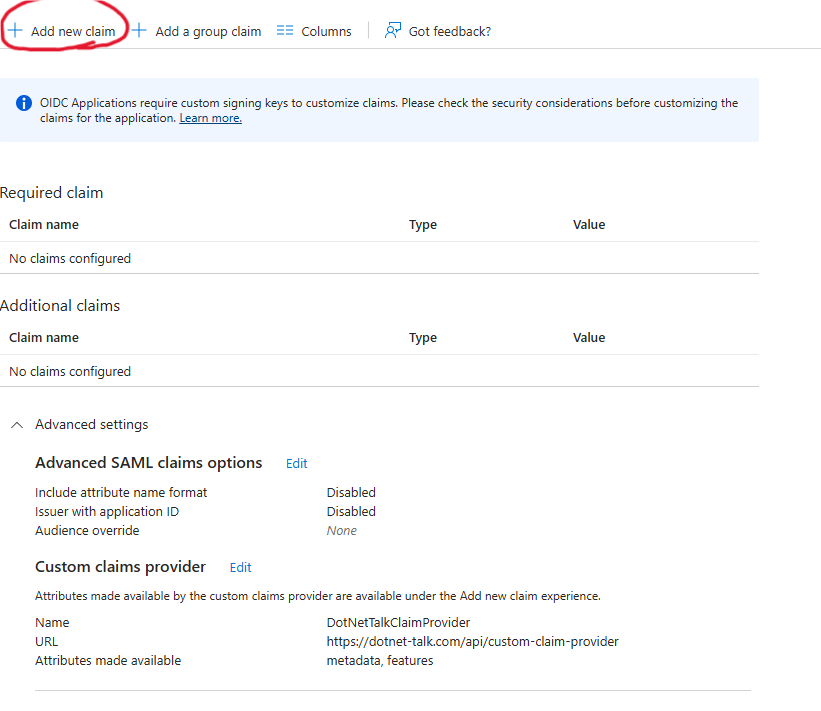
On the next page, you’ll see a list of your custom claims. In the Name field, enter the name of the claim. You can leave the Namespace field blank. From the Source attribute dropdown, select your custom claim.
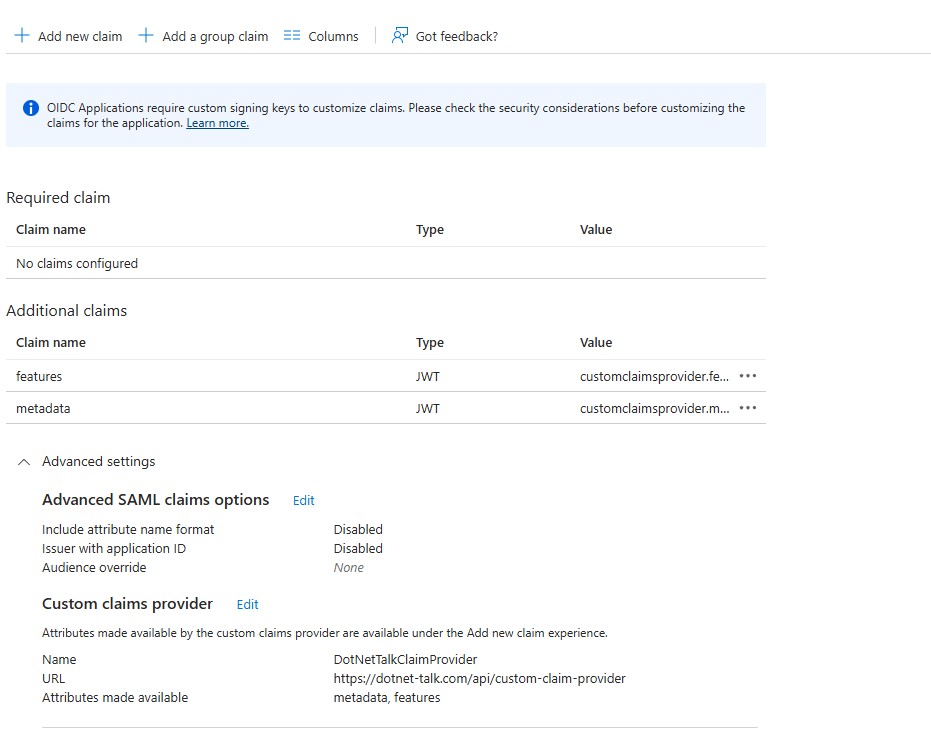
In the end, you should see something like this in the Attributes & Claims section of your Enterprise Application. As you can see, you have configured your custom claim provider and added additional claims. At this point, everything is set up and you can now use this App Registration for authentication in your application.
Final Configuration Steps
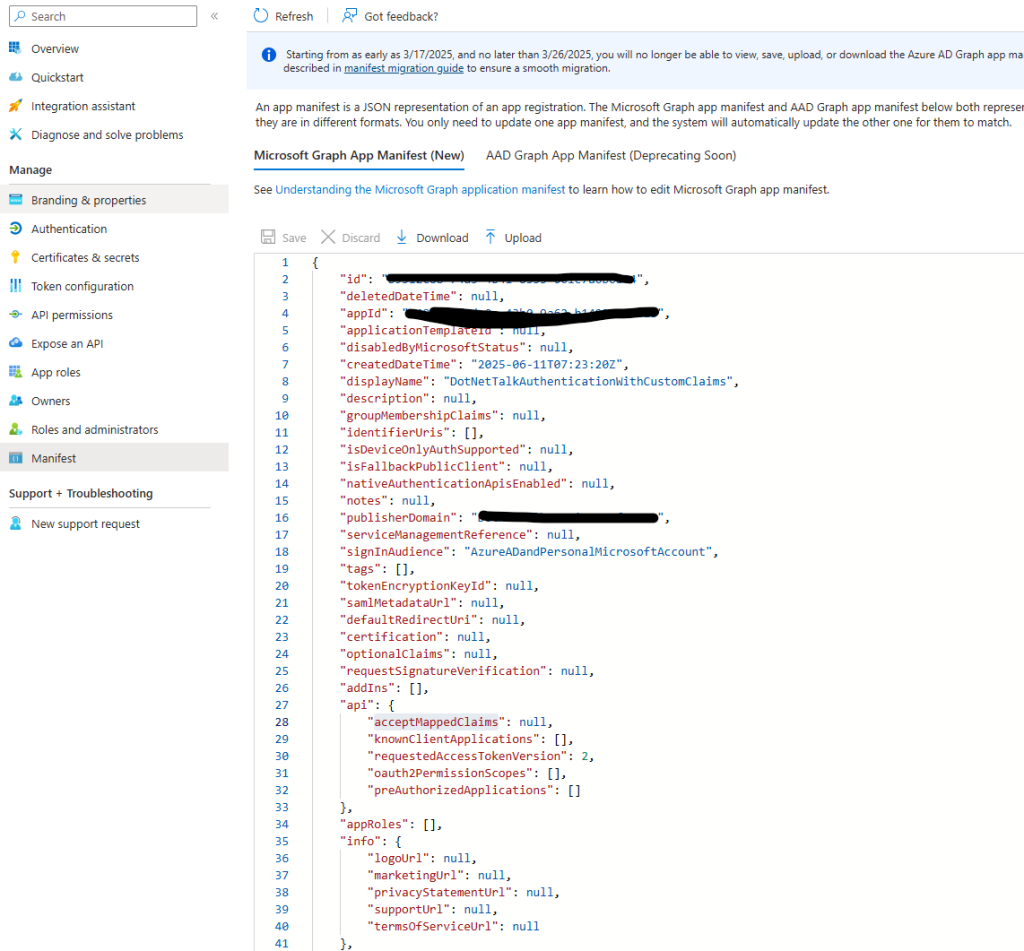
We still have two important steps ahead. First, we need to enable the custom claims feature in the manifest of the authentication application.
Enabling Mapped Claims in the Manifest
To do this, go to the authentication application. From the left sidebar, select the Manifest section. In the opened manifest—which is a JSON file—look for the acceptMappedClaims entry and change its value from null to true.
Authorizing Client Applications
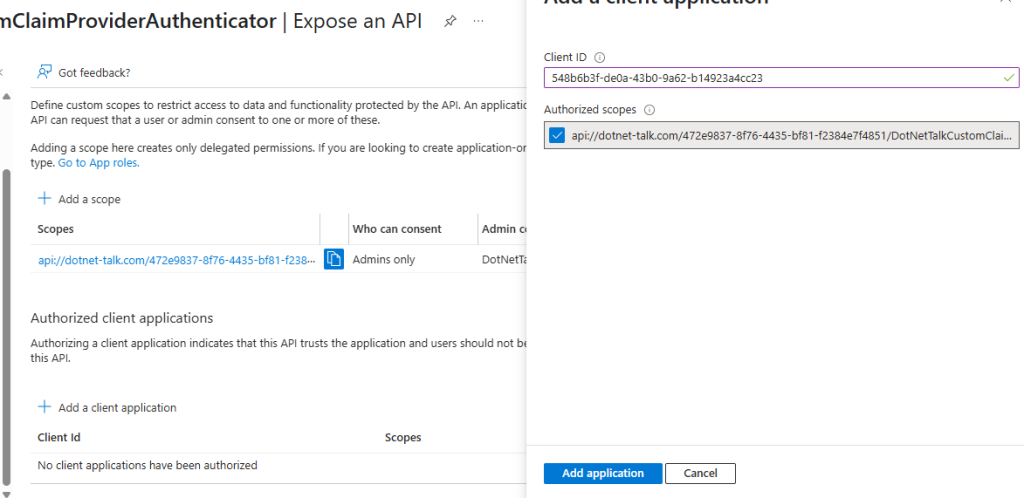
Now, you need to allow the app registration related to authentication in your own software to use the API of the app registration that you created for Authentication in the Custom Authentication Extension.
To do this, first copy the App Registration ID of the authentication application. Then go to the App Registration for the custom claim extension authentication. Here, go to the Expose an API section and first add a scope to the API.
To add a scope, select Admin Only in the “Who can consent?” field, and write simple descriptions in the “Admin consent display name” and other description fields. Then click the Add Scope button. By doing this, you allow the App Registration to be used by another App Registration—in this case, the app registration for authentication in your own software.

Next, in the Authorized client applications section, click the Add a client application button. In the client ID field, enter the client ID of the app registration related to authentication in your software, select the scope you just created, and click Add Application.
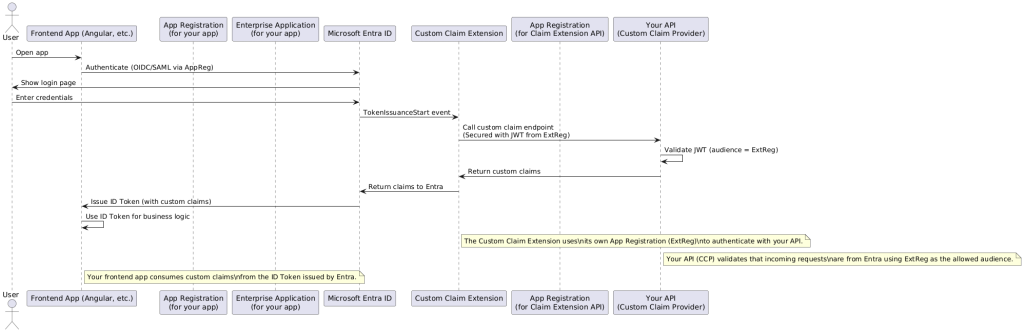
Summary: How Everything Connects
In this architecture, user authentication starts when the frontend app (such as an Angular SPA) redirects the user to Entra ID via its own App Registration. During the authentication pipeline, Entra triggers the Custom Claim Provider Extension, which itself is securely linked to a separate App Registration used exclusively for API authentication.
The extension uses this registration to obtain a signed JWT, which it presents to your API (the custom claim provider endpoint). Your API validates the JWT, ensuring requests originate from the trusted extension, and then returns the required custom claims.
The extension relays these claims back to Entra ID, which embeds them into the user’s ID Token. The frontend app then consumes these enriched tokens, enabling granular access control and personalized business logic—all while maintaining secure, clearly defined boundaries between each component in the system.
Conclusion
Implementing Entra ID custom claims SSO provides a robust solution for embedding application-specific permissions directly into your authentication tokens. By following this guide, you’ve learned how to build a custom claims provider API, configure Entra ID to call your API during token issuance, and wire up your application to consume these enriched tokens.
This approach offers significant advantages over traditional authorization patterns: improved performance by eliminating repeated permission lookups, enhanced security through cryptographically signed claims, and a cleaner architecture where the JWT serves as the single source of truth for both authentication and authorization.
Whether you’re building enterprise applications, SaaS platforms, or any system requiring fine-grained access control, custom claims in Entra ID provide a scalable and secure foundation for your identity management needs.
Further Reading & Source Code
- You can find the full API source code along with all PlantUML diagrams in this repository: https://github.com/MehdiMohseni82/entra-custom-cliam-provider-api
- For more information, refer to the official Microsoft documentation. While some details are not explicitly covered there, it provides a solid overall explanation of the process.
- Learn how to build intelligent .NET applications with our guide on Building a RAG System in .NET.
