
I am designing software for integrating with their warehouse management system for one of my clients. Communication with this system is done through the WebSocket. Integration via WebSocket may not be a common method, but it can be said that it's faster than many common methods such as Rest and WebService. In any case, I decided to write a short article on how to create a WebSocket server and client on .NETCore 3.
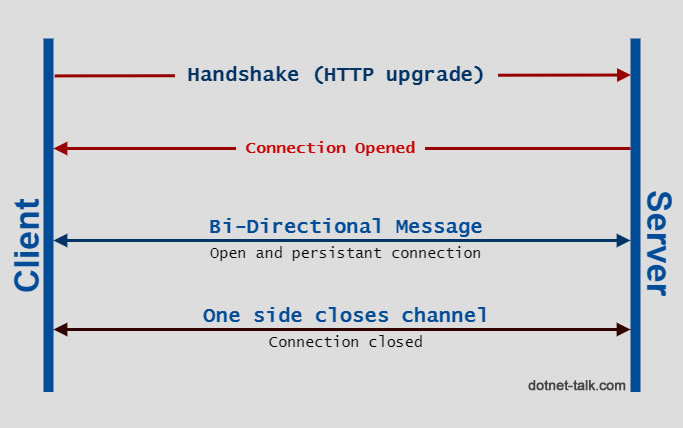
WebSocket (RFC 6455) is a protocol that enables two-way persistent communication channels over TCP connections. It's used in apps that benefit from fast, real-time communication, such as chat, dashboard, and game apps.
The WebSocket protocol allows interaction between a web browser (or other client applications) and a web server with servers lower overhead than half-duplex options such as HTTP polling and facilitates real-time data transfer from and to the server.
This is possible by providing a standard way to send the server without the need for a customer request, and the ability to send messages when the connection is open. In this way, a continuous two-way conversation can take place between the customer and the server.
This is a small chat server/client application that I wrote using Asp.Net Core WebSocket Middleware.
The Asp.Net Core WebSocket Middleware makes it possible to listen to requests on WebSocket protocol over normal HTTP requests. It's essential that we have the WebSocket Middleware in the right order otherwise we get requests after other Middleware.
Middleware is software that's assembled into an app pipeline to handle requests and responses. Each component:
In the Startup.cs we need to use UseWebSockets() method to add the WebSockets Middleware to the host pipeline. So, by adding that the Host accept WebSocket request over HTTP.
As you can see the WebSocket Middleware is configurable. The following settings can be configured:
After we added the WebSocket Middleware then we need to listen and handle WebSocket requests. The listener should have this signature to can be added as Middleware handler:
async (context, next)
I preferred to have the Middleware handler as a private method () but it's also possible to have it as an inline method
If the Host is running just for WebSocket request then we don't need to filter requests but if the WebSocket is part of a host which also accept other request types, then we need to filter request.
In the above code, I have done two things.
Honestly, I first created the client application on the console, but then, my interest in WPF led me to create it as a small Windows application using WPF.
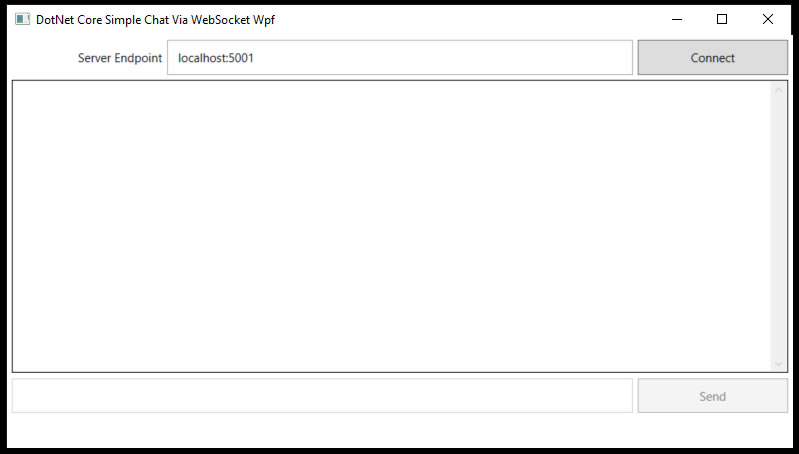
When the user clicks on the Connect button, I call the RunSocket method. This method is very simple. All I do is instantiate a ClientWebSocket and then connect to the server using the ConnectAsync() method.
I got the server URL from the user input. But I hardcoded the type of connection (HTTPS or HTTP). The only reason for this was the lack of time, and I hope to be able to upgrade the program in the future so that the user can also specify the type of connection. However, we use wss for communication on HTTPS and ws for communication on HTTP.
I also generate an ID for the client. Something that should be replaced in a real chat app with a username and password.
After I connect WebSocket to the server, I need to constantly listen to the server messages. I made a Listen task that does this. Note that this must be done via an asynchronous way. Any blocking of the process in WebSocket connections may cause the server to disconnect.
The ReceiveAsync() method reads the messages sent on the WebSocket in the buffer with specific sizes and returns them to the specified variable. Note that in the current implementation, this means that if the user's message is larger than 4 KB, the user's message will be broken in more than one line on the message screen.