Connect to an electrical relay from .Net Core Windows Universal App

October 4, 2020
Introduction
For many years, writing an application that connects to hardware and controls it was very challenging. You even needed specialized tools to burn your code onto the hardware!
.NET Core now provides a very convenient way to write your application and deploy it to a Raspberry Pi. Its cross-platform capabilities allow you to host your application on Raspberry Pi OS. Additionally, you can install Windows for Internet of Things (IoT) and deploy your Windows Universal Application there — and yes, you can have a full GUI with it!
General Idea
I’m new to both Windows IoT and .NET Core IoT. I started a few weeks ago and wanted to come up with a fun idea for a project. My goal was to explore how to connect different technologies.
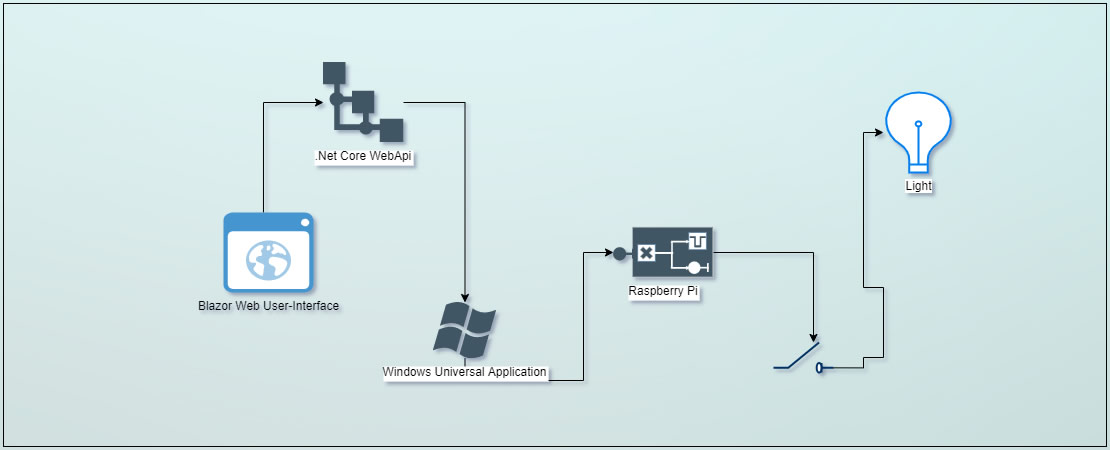
Eventually, I landed on the idea of creating a Morse messenger: a light connected to an electrical relay, controlled by a Windows Universal App. The app is hosted on a Windows IoT device running on a Raspberry Pi 3.
I also built a simple user interface using Blazor. The Blazor app sends a message to a .NET Core Web API, which then pushes a notification to the Windows Universal App on the Raspberry Pi. Finally, the Windows Universal App translates the string into Morse code and toggles the light on and off accordingly.
Raspberry Pi Gpio Pins
The first step in learning how to connect a Raspberry Pi to hardware is understanding GPIO pins. GPIO pins are the gateway to all external hardware. I can guide you to the official documentation on RaspberryPi.org about GPIO pins.
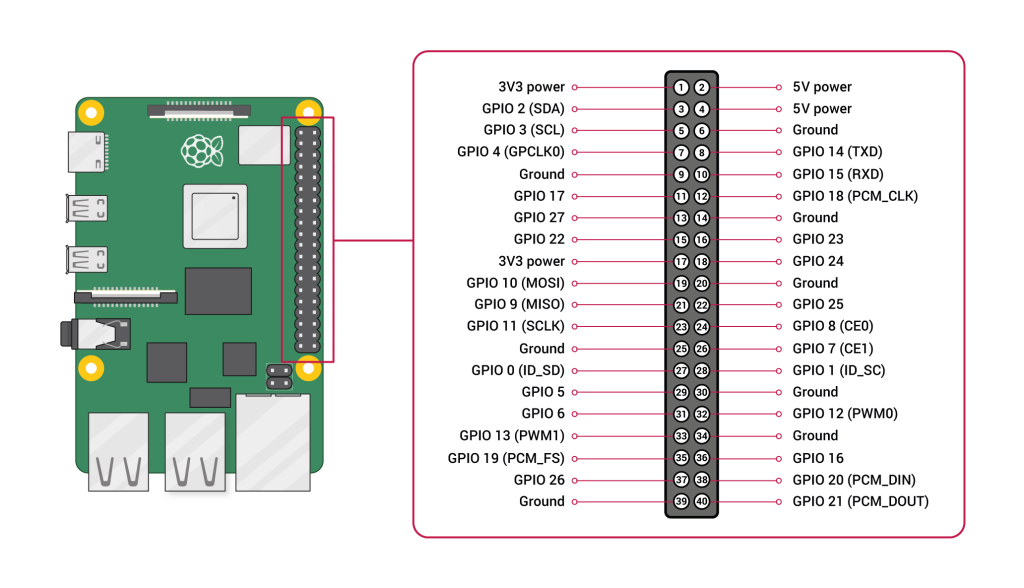
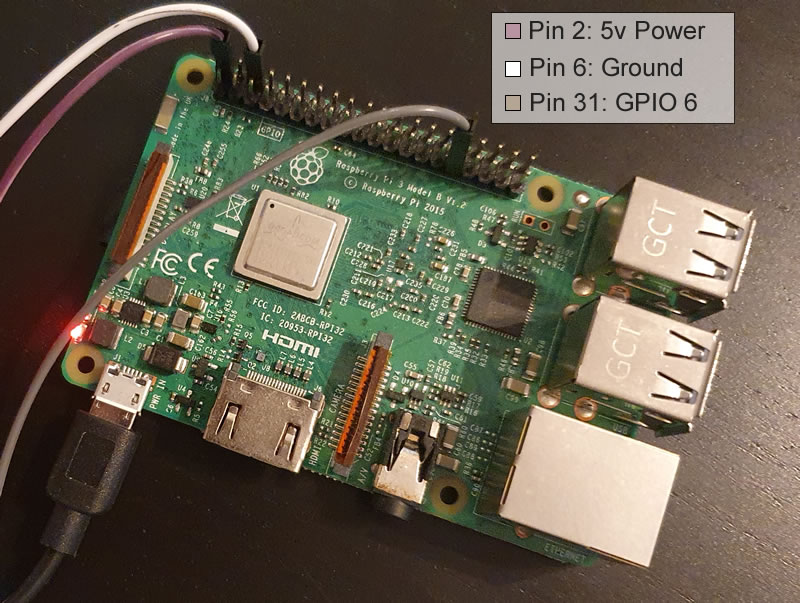
To control an electrical relay, you need a 5V circuit and an understanding of how to open and close the circuit. For my setup, I used Pin 2 for 5V power, Pin 6 for ground, and Pin 31 as a GPIO controller pin.
A GPIO controller pin is a pin you can control directly through your software.
In the software, you specify the purpose of the GPIO controller pin. For example, in this app, we are using GPIO 6 (Pin 31) for the simplest use case: Output.
I mention “simplest” because using GPIOs for input or more advanced purposes is a little more complex.
Windows 10 for IoT
As I mentioned earlier, I am using Windows 10 IoT to host my application on the Raspberry Pi. However, for my use case — which simply provides a gateway and listens for push notifications from the API — Windows 10 IoT may not be the best solution. Since I don’t need to provide a graphical user interface on the Raspberry Pi, a lighter, headless operating system would be more appropriate.
How to install “Windows 10 for IoT” the Raspberry Pi
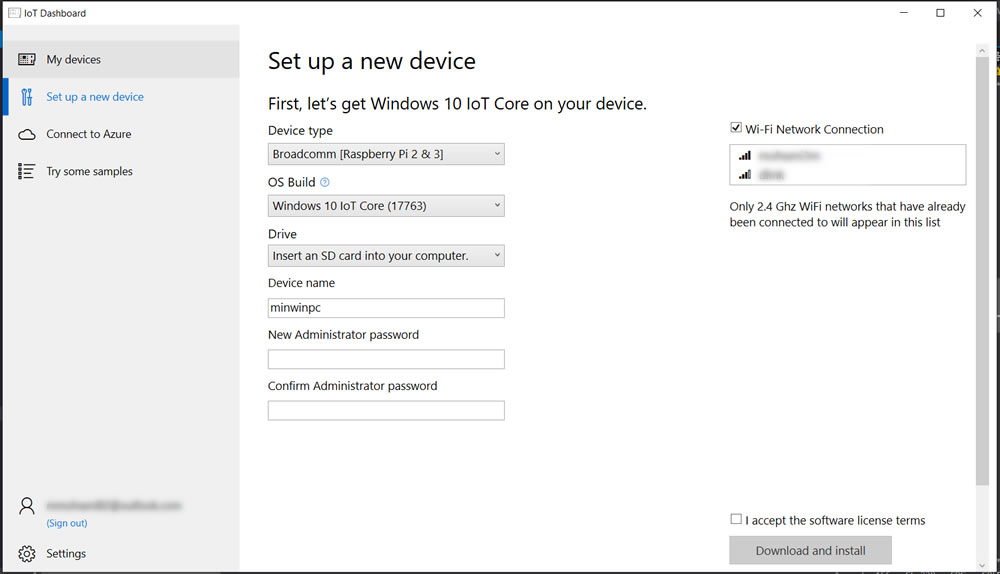
To install Windows 10 IoT on a Raspberry Pi, you first need to install the Windows 10 IoT Dashboard on your Windows machine.
Once the IoT Dashboard is installed, the process is simple: you select your device type, choose the desired OS version, and flash it onto an SD card.
Universal Windows Application
What’s a Universal Windows Platform (UWP) app?
UWP (Universal Windows Platform) is one of several ways to create client applications for Windows. UWP apps leverage WinRT APIs to deliver powerful user interfaces and advanced asynchronous features, making them ideal for internet-connected devices.
Features of a UWP app
A UWP app is:
- Secure: UWP apps declare which device resources and data they access, and users must authorize that access.
- Cross-Platform: Able to use a common API across all devices running Windows 10.
- Adaptive: Capable of utilizing device-specific capabilities and adapting the UI to different screen sizes, resolutions, and DPI settings.
- Distributable: Available through the Microsoft Store on all Windows 10 devices (or only the ones you specify), with multiple monetization options.
- Safe to Install/Uninstall: Installable and removable without risk to the machine or causing “machine rot.”
- Engaging: Supports live tiles, push notifications, user activities, and integration with Windows Timeline and Cortana’s “Pick Up Where I Left Off” feature to engage users.
- Flexible in Development: Programmable using C#, C++, Visual Basic, or JavaScript, with UI development supported by WinUI, XAML, HTML, or DirectX.
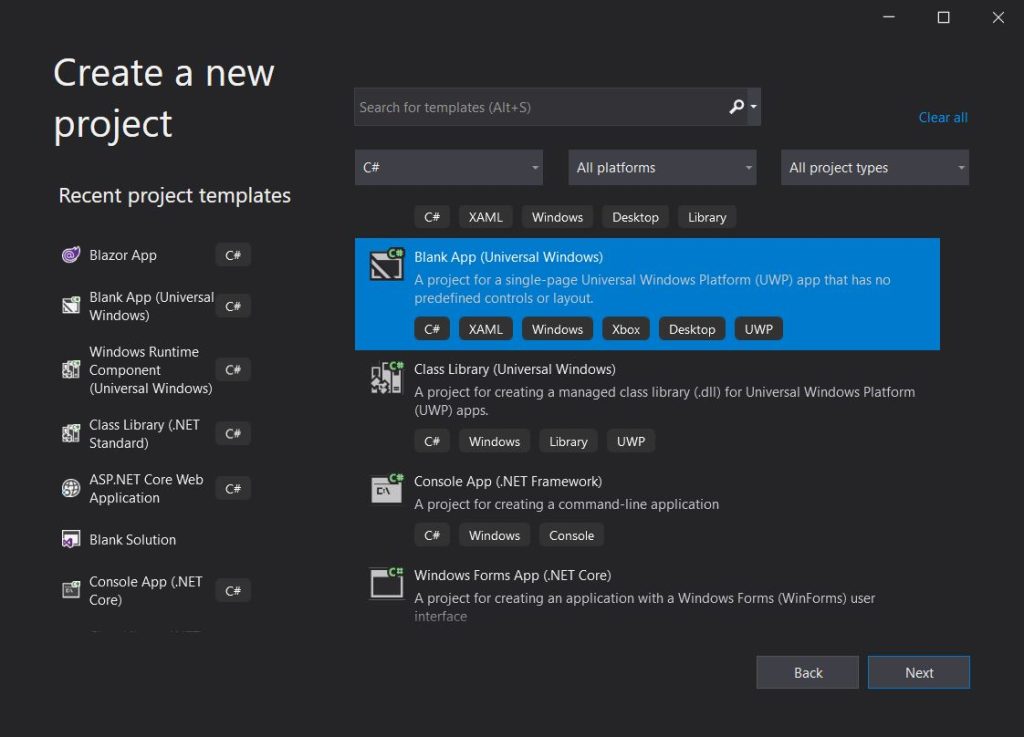
Create a Universal Windows Platform Application on the Visual Studio
In your Visual Studio, you just need to go the File -> New -> Project and then,
If you are familiar with WPF, creating a user interface and writing XAML for a Universal Windows Platform (UWP) application will feel very straightforward.
Here is my super simple UI for the application: it displays new messages in a ListBox when the API sends a user message via push notification.
Connect to GPIO in the .Net Application C# code
Here, you can see how to connect and initialize GPIO pins in .NET Core.
First, you need to instantiate a GPIO controller using GpioController.GetDefault();.
In .NET Core, it is very straightforward to connect to a pin and specify its purpose.
Using _bluePin.SetDriveMode(GpioPinDriveMode.Output);, you define the pin’s mode (for example, setting it for output).
Then, by using the Write method, you can send Low or High signals to the pin.
Subscribe for Push Notification
To subscribe to the Push Notification Server, you need to create a HubConnectionBuilder and specify the server URL.
Make sure to enable WithAutomaticReconnect to handle reconnections in case the server goes offline.
After setting up the connection, you can listen for a specific method and define the action to trigger when a push notification is received.
Once that’s done, you simply start listening — it’s that easy!
UI and WebApi
For the rest of the solution, I won’t go into the details. As mentioned in the title, I used a Blazor front-end application for the UI and .NET Core Web API for the RESTful API.
You can view and download the code from my GitHub repository: dotnet-talk-morse.
And feel free to send me a message through the UI in Morse Messenger — and light up a lamp in my apartment!
Sources
